Plan C
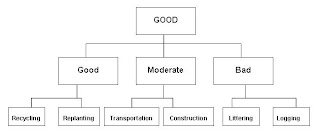
-6 scenes, 2 scenes under each of the 3 main scenarios: Good, Moderate and Bad scenarios. My previous plan was 12 scenes under those 3 main scenarios.
-The 6 scene done were: Recycling, Replanting, Construction, Transportation, Littering and Logging.
- Screen size is smaller, it's roughly about 6ft length 4 ft height instead of full body projector screen.
- The rest of the plan (the floor hot spots, the technical name).
-Though this is not very important, but the project screen material used is changed from cloth to unused spare paper found lying about. (Reduce, Reuse, Recycle! =])
Flash Application
Ever since critque 2 (23/11/09), I've realise how much using real-like bitmap images to create the scene will takes a long time and if you don't photoshop the images properly, you'll spot flaws when the image is blown up to full screen. Thus I moved on to using vector images. This is how each of the 3 Main Scenarios looks like vectorize:
What's left to do is little simple actionscript and lots of animation.
Experimentation
I had done some experimentation with the projector. By having an actual projector in my hands for in-class experimental purposes, I have tested out for the projector's screen size.
I've tried out how long would the throw distance be to get a life size projection from the projector. It was more that 12 feet. This would have been possible if I had the whole room space available for my installation, especially since I'm using rear projection. Unfortunately it's not (sharing limited room size with other fellow classmates), therefore for this semester's installation presentation: I'm considering on cutting down the projection size into 4' x 3'. That would mean the throw distance is 5' to 6'. Considerably shorter than 12'.
Then I tried different materials aside from using a white cloth as a projector screen. I've used different types of paper with different thickness and found even at 12' throw distance (though a bit dimmer), the image can be seen through the other side. Thus this helps minimize paper and I've found unused cartridge papers around, in which I thought I could use instead of buying a cloth.
Then I tried experimented zone trigger with the room's dim lighting. In zone trigger I've planned to assigned each of the 6 hot spots to activate 6 alphabets each when triggered. Therefore I've already assigned each scene to activate upon keyboard press. I've used D, M, G, R, E & N for each scene and hot spot. However while assigning the hot spots in zone trigger, I've realised that I could assign 3 hot spots because I'm using a trial version of zone trigger with 15 days limit. I need to 'buy' zone trigger to get more than 3 hot spots. So I've tested 3 hot spot first and it works! =) So the system integration of the whole get up works compatibly with each other fine. Though I had to spend a few minutes trying out different camera position to work out together with the lighting so that zone trigger can sense motion to trigger the application's scene.
Pictures:
 Subscribe


No comments:
Post a Comment