The Finale

|1 comments
The final setup and presentation today. Total days of 'camping', testing and presetting the installation was about 2 and half weeks. Number of days needed for actual setup of the installation is 1 day (with all equipment ready at hand).

Unsatisfied the plan's straying to Plan C, however satisfied the setup of the whole system is workable and manageable. In other words, this project would have been better with more time and development =).


Cd Cover:


Final Installation (Plan C):


Special thanks to:
- The lecturers (Mr. KY, Mr. Bad, Mr. Rozi & other DM lecturers).
- My fellow DM classmates and friends (Elian, Jaz, Jo, Wan, Farah, Laini, Mie, Mahdi, Yassier & Khai.J).
- Dr. Khoo for coming to my presentation.


- The End -

Installation Manual

|0 comments
Minimum System Requirements:


Flash Player Installation
  1. Download standalone flash player from Adobe's Website.

  2. After download, run the installer and follow the installing instructions.

  3. After installation, you're done!


Zone Trigger Installation:
  1. Download Webcam Zone trigger installer from: http://www.zonetrigger.com/motion-detection or get from the CD by going to "3rd Party Installer" folder -> "ZoneTriggerInstaller.exe". *
    * Please note by using the trial version, the limit is 15 days and 3 hot spots max. You need to buy the software to enable full use of "A Stroll" installer.

  2. After download, install the program by running the installer and follow the software's installation instruction.

  3. After installation is complete, you're set to run the program!


A Stroll Application
  1. Ensure your webcam is connected to your computer and it's functionable.

  2. Open Webcam Zone Trigger program**
    **Should already be installed. If not, refer to Zone Trigger Installation

  3. Go to Pro mode

  4. Click on File -> Load Setting and open "greensave.sav" under Setting File folder in the CD

  5. Right click at the big grey screen, and select "Select another device". The image captured by your webcam should be shown on your screen. ***
    ***If it's not showing, refer to Setting Zone Trigger


  6. Check if all the hot spots (the circles) are positioned properly. If not, click hold inside the circle of the affected hot spot(s) and drag it to the correct position.

  7. Leave the program running after setting. Do not close the window!

  8. Run "A Stroll" application by opening "Main.exe" under Publish Files folder, and maximize it by pressing Ctrl + F.

  9. Now the installation's application is running.

  10. If A Stroll application is not working as it's suppose to be, refer to Setting Zone Trigger .


Setting Zone Trigger

1) Webcam image isn't capturing at step 4 (A Stroll Application).
This means you would need to set a new zone trigger setting from scratch. This is how:
  1. On the program, click File-> New Environment (if notification pops up, click Yes)


  2. Click on the Camera with a plus icon and find your webcam's name in number 2 "Choose a video capture device". Your image capture should appear. ****
    ****If the problem persist, it's your webcam's problem. Check your webcam and ensure it's functionable otherwise get a new webcam)

  3. Create 6 hot spots by clicking a Circle with a plus icon and position/resize them on your webcam's captured image.

  4. For all hot spots, label their Names according to the scenes, ensure they are set to Motion Spots (type) and set all to Keyboard Key (action).*****
    *****Keyboard keys: recycling= D ; replanting= M ; transportation= G ; construction= R ; littering= E ; logging= N

  5. Save your settings by going File-> Save Settings.


2) A Stroll application is not working
The setting in zone trigger isn't working with your room lighting to be able to detect motion. You might need to set the hot spots sensitivity:
  1. At Zone Trigger Program, adjust the sensitivity for each hot spots by moving the sensitivity level.

  2. If sensitivity adjusting don't work, you can adjust your room light setting to ensure your webcam can see well enough to detect motion properly.

Artist Impression, Poster, Budget & Statement

|1 comments
Artist Impression

Video:


Pictures:


The Poster


Equipment Budget List


Statement:

This project is an installation which shows the type of impact we have on trees and learning green ways.

Living or to go "green" is changing your lifestyle that least affect or damage our natural environment and reduce environmental issues. Especially towards trees, everyday human activities can directly and indirectly affect it.

The audience will be walking through the installation as if they are walking through a forest. Upon stumbling in, they will activate different ‘human activities’ which will change the forest’s scenery. The forest’s changes are triggered via webcam, which acts as a sensor that sense audience’s presence and monitors which human activity the audience activated.

Each of the human activity scenery has its own story and ‘green’ knowledge when activated. Story and information are shown through visuals and sounds. The audience is to experience, learn and interpret the human activity’s information and story they activated.

Then until Now (Plan C)

|0 comments
8 Weeks' too short to execute my previous intention. Thus here's the new plan:

Plan C
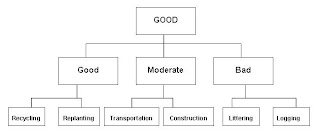
-6 scenes, 2 scenes under each of the 3 main scenarios: Good, Moderate and Bad scenarios. My previous plan was 12 scenes under those 3 main scenarios.


-The 6 scene done were: Recycling, Replanting, Construction, Transportation, Littering and Logging.


- Screen size is smaller, it's roughly about 6ft length 4 ft height instead of full body
projector screen.

- The rest of the plan (the floor hot spots, the technical name).

-Though this is not very important, but the
project screen material used is changed from cloth to unused spare paper found lying about. (Reduce, Reuse, Recycle! =])


Flash Application
Ever since critque 2 (23/11/09), I've realise how much using real-like bitmap images to create the scene will takes a long time and if you don't photoshop the images properly, you'll spot flaws when the image is blown up to full screen. Thus I moved on to using vector images. This is how each of
the 3 Main Scenarios looks like vectorize:


What's left to do is little simple actionscript and lots of animation.


Experimentation
I had done some experimentation with the projector. By having an actual projector in my hands for in-class experimental purposes, I have tested out for the projector's screen size.

I've tried out how long would the throw distance be to get a life size projection from the projector. It was more that 12 feet. This would have been possible if I had the whole room space available for my installation, especially since I'm using rear projection. Unfortunately it's not (sharing limited room size with other fellow classmates), therefore for this semester's installation presentation: I'm considering on cutting down the projection size into 4' x 3'. That would mean the throw distance is 5' to 6'. Considerably shorter than 12'.

Then I tried different materials aside from using a white cloth as a projector screen. I've used different types of paper with different thickness and found even at 12' throw distance (though a bit dimmer), the image can be seen through the other side. Thus this helps minimize paper an
d I've found unused cartridge papers around, in which I thought I could use instead of buying a cloth.

Then I tried experimented zone trigger with the room's dim lighting. In zone trigger I've planned to assigned each of the 6 hot spots to activate 6 alphabets each when triggered. Therefore I've already assigned each scene to activate upon keyboard press. I've used D, M, G, R, E & N for each scene and hot spot. However while assigning the hot spots in zone trigger, I've realised that I could assign 3 hot spots because I'm using a trial version of zone trigger with 15 days limit. I need to 'buy' zone trigger to get more than 3 hot spots. So I've tested 3 hot spot first and it works! =) So the system integration of the whole get up works
compatibly with each other fine. Though I had to spend a few minutes trying out different camera position to work out together with the lighting so that zone trigger can sense motion to trigger the application's scene.


Pictures:

Installation Objectives

|0 comments
What's users' current behaviours:
  • Lack of recycling trend
  • Increase of unhealthy lifestyles (e.g. physical laziness, too tech dependent, smoking, etc)
  • Disrespect to environment (e.g. littering)


How the project's message get through user?
  • Sound- the 'voices' of the trees/environment
  • Image- information about green and consequences of human activity
  • Animation- information about green and consequences of human activity


What information user will get?
  • Environmental consequences
  • Going Green
  • Other alternatives to healthier lifestyle/activity

Gathering Materials

|1 comments
Some minor issues upon gathering image materials without nabbing off from the net. There's a suitable few.. but probably not enough/unsuitable images. I'm still looking through my own photo collection, but if I don't find enough I'll probably change the whole installation to vectorize rather than real images.

But if there's anyone reading this and have a few collection of their pics to spare to me, I would ever be sooooooo grateful. The following pics that most needed now are:
  • Environmental community service (plant tree, clean up beach, etc)
  • Nice Scenary (beach, forest, green, etc)
  • Recycle funs (e.g. crafting/using old materials into something new)

At the moment, those are what's need now, I'll post up later if I think of anymore.

Project Reflection 2

|1 comments
Since last class, the installation will be changed into 1 side screen due to the availiblity of equipment and height problems. This means I'm reverting back to my previous technical plan, and will still stick to rear projection. Of course, depending on how much space in needed behind the screen for desired screen size... the use of mirrors/reflective surfaces to shorten the distance will be also be used as a back up.


I'm also reconsidering the way how the information/narration about green is being presented. Since showing complete real images would seemingly dull the installation, maybe some of the narration could be presented through animation...? This would also avoid problems of being unable to obtain some real images (e.g. wildfires) of my own without taking from internet. Below is an example: